왜 winston을 고르게 되었는가?

NestJS에서 logging을 구현하는 방법에는 여러가지가 있다. 기본적으로 @nestjs/common에 내장된 logger가 있긴하지만, package에는 편리한 기능들이 구현되어 있다.
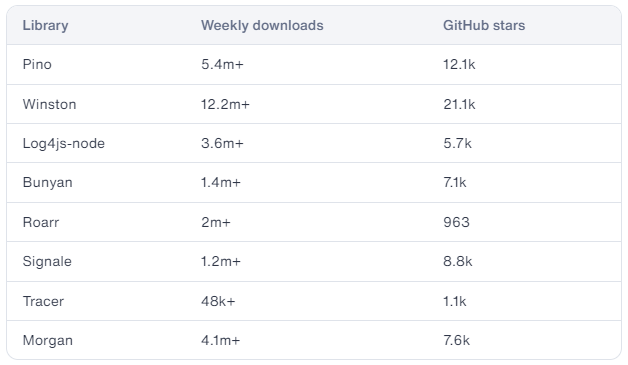
pino, morgan 등 JS 진영에서 쓸 수 있는 여러 package들이 있는데, 본인은 templete을 만들기 위해 가장 대중적인 패키지를 찾고 싶었고, 'popular node js logging'로 구글링을 해본 결과 아래와 같은 자료를 찾을 수 있었다.

2023년 10월 기준으로 Winston이 많은 download를 기록하고 있었고, typescript를 지원하였기에 많은 레퍼런스를 기대하며 고르게 되었다.
구현 방식
Logger 불러오기
Logger를 불러오는 방법에는 여러가지가 있었다. 전역적으로 사용하기 위해서 NestApplicationContext 내의 option 중 logger를 대체하는(Replacing the Nest logger) 방법도 있고, LoggerModule을 추가한 뒤 필요한 부분에 Inject해서(원한다면 Global로) 사용하는 방법도 있었다.
* 참고 : nest-winston - npm (npmjs.com)
본인은 Bootstrapping 단계부터 logging 되기를 원했기에 'Replacing the Nest logger ' 방법을 선택했다.
Logger로 Logging 하기
그러면 불러온 Logger로 Logging은 어떻게 해야할까? Winston Docs에서는 아래와 같이 'Controller에 Logger를 Injection해서 필요한 부분을 로깅'하는 방법의 예시를 보여주고 있다.
import { Controller, Get, Logger } from '@nestjs/common';
import { AppService } from './app.service';

@Controller()
export class AppController {
  constructor(
    private readonly appService: AppService,
    private readonly logger: Logger,
  ) {}

  @Get()
  getHello(): string {
    this.logger.log('Calling getHello()', AppController.name);
    this.logger.debug('Calling getHello()', AppController.name);
    this.logger.verbose('Calling getHello()', AppController.name);
    this.logger.warn('Calling getHello()', AppController.name);

    try {
      throw new Error()
    } catch (e) {
      this.logger.error('Calling getHello()', e.stack, AppController.name);
    }

    return this.appService.getHello();
  }
}예시 코드를 보면 logger를 상황마다 직접 사용하게 되는데, 이 경우 코드 가독성을 해칠 수 있고, controller의 역할이 커진다. log format을 일정하게 유지하거나, 바꾸기도 쉽지 않을 것이다.
이러한 이유로 NestJS Docs에서는 middleware로 logger를 관리하는 예시를 보여주고 있다.
* 참고 : Middleware | NestJS - A progressive Node.js framework
NestJS의 장점 중 하나는 LifeCycle을 활용해서 관심사를 분리할 수 있다는 점이다.

위의 그림은 NestJS에서 Request의 LifeCycle을 보여주고 있다.
프로젝트에서 Logger의 역할을 생각해보았을 때,
(1). 사용자가 요청한 기록을 Logging
(2). 만약 Error가 발생했을 때 기록을 Logging
정도를 생각해볼 수 있을 것이다.
그렇기에 (1)을 만족하기 위해서 logger.middleware를 만들어서 사용자 요청을 logging할 것이며, (2)를 만족하기 위해서 exception.filter를 만들어서 Error가 발생한 부분의 정보를 로깅할 것이다.
Package 설치
npm install --save winston nest-winston winston-daily-rotate-file
Code
1. NestJS 내장 Logger를 replace해준다.
// main.ts
...
import { winstonLogger } from './config';

async function bootstrap(): Promise<string> {
  const app = await NestFactory.create<NestExpressApplication>(AppModule, {
    bufferLogs: true,
    logger: winstonLogger, // replacing logger
  });

  await app.listen(process.env['PORT'] || 3000);

  return app.getUrl();
}
2. logger.config 파일에 winstonLogger(WinstonModule)을 설정하고 export 해준다.
// config/logger.config.ts

import { utilities as nestWinstonModuleUtilities, WinstonModule } from 'nest-winston';
import winstonDaily from 'winston-daily-rotate-file';
import * as winston from 'winston';

const isProduction = process.env['NODE_ENV'] === 'production';
const logDir = __dirname + '/../../logs';

const dailyOptions = (level: string) => {
  return {
    level,
    datePattern: 'YYYY-MM-DD',
    dirname: logDir + `/${level}`,
    filename: `%DATE%.${level}.log`,
    zippedArchive: true,
    maxSize: '20m',
    maxFiles: '14d',
  };
};

export const winstonLogger = WinstonModule.createLogger({
  transports: [
    new winston.transports.Console({
      level: isProduction ? 'info' : 'silly',
      format: isProduction
        ? winston.format.simple()
        : winston.format.combine(
            winston.format.timestamp(),
            winston.format.ms(),
            nestWinstonModuleUtilities.format.nestLike('MyApp', {
              colors: true,
              prettyPrint: true,
            }),
          ),
    }),
    new winstonDaily(dailyOptions('info')),
    new winstonDaily(dailyOptions('warn')),
    new winstonDaily(dailyOptions('error')),
  ],
});
3. Logger Moddleware를 구현해준다. NestMiddleware를 implement하고, 모든 request에 대해서, 동일한 logging format을 유지할 수 있도록 해준다.
( 본인은 ip, method, originalURL, userAgent, user_id를 logging하기로 했다.)
// common/middleware/logger-context.middleware.ts
import { Inject, Injectable, Logger, LoggerService, NestMiddleware } from '@nestjs/common';
import { JwtService } from '@nestjs/jwt';
import { NextFunction, Request, Response } from 'express';
import { JwtPayload } from '../../../src/auth';

@Injectable()
export class LoggerContextMiddleware implements NestMiddleware {
  constructor(
    @Inject(Logger) private readonly logger: LoggerService,
    private readonly jwt: JwtService,
  ) {}

  use(req: Request, res: Response, next: NextFunction) {
    const { ip, method, originalUrl, headers } = req;
    const userAgent = req.get('user-agent');
    const payload = headers.authorization
      ? <JwtPayload>this.jwt.decode(headers.authorization)
      : null;
    const userId = payload ? payload.sub : 0;
    const datetime = new Date();
    res.on('finish', () => {
      const { statusCode } = res;
      this.logger.log(
        `${datetime} USER-${userId} ${method} ${originalUrl} ${statusCode} ${ip} ${userAgent}`,
      );
    });

    next();
  }
}
4. Common Module을 Global 모듈로 설정하고, 모든 route '*'에 대해서 logger.middleware를 적용하도록 한다.
// common/common.module.ts
import { Global, Logger, MiddlewareConsumer, Module, NestModule } from '@nestjs/common';

import { LoggerContextMiddleware } from './middleware';
import * as providers from './providers';
import { JwtModule } from '@nestjs/jwt';

const services = [Logger, ...Object.values(providers)];

@Global()
@Module({
  imports: [JwtModule.register({})],
  providers: services,
  exports: services,
})
export class CommonModule implements NestModule {
  public configure(consumer: MiddlewareConsumer): void {
    consumer.apply(LoggerContextMiddleware).forRoutes('*');
  }
}
5. 추가적으로 모든 오류에 대해서 logging을 할 수 있도록 exception filter에 logger를 추가해준다.
// common/filters/exception.filter.ts
import { Catch, ArgumentsHost, HttpStatus, HttpException, Logger } from '@nestjs/common';
import { Request, Response } from 'express';
import { QueryFailedError } from 'typeorm';

enum MysqlErrorCode {
  ALREADY_EXIST = 'ER_DUP_ENTRY',
}

@Catch()
export class ExceptionsFilter {
  private readonly logger: Logger = new Logger();

  public catch(exception: unknown, host: ArgumentsHost): void {
    let args: unknown;
    let message: string = 'UNKNOWN ERROR';

    const ctx = host.switchToHttp();
    const res = ctx.getResponse<Response>();
    const req = ctx.getRequest<Request>();
    const statusCode = this.getHttpStatus(exception);
    const datetime = new Date();

    message = exception instanceof HttpException ? exception.message : message;
    message = exception instanceof QueryFailedError ? 'Already Exist' : message;

    const errorResponse = {
      code: statusCode,
      timestamp: datetime,
      path: req.url,
      method: req.method,
      message: message,
    };

    if (statusCode >= HttpStatus.INTERNAL_SERVER_ERROR) {
      this.logger.error({ err: errorResponse, args: { req, res } });
    } else {
      this.logger.warn({ err: errorResponse, args });
    }

    res.status(statusCode).json(errorResponse);
  }

  private getHttpStatus(exception: unknown): HttpStatus {
    if (
      exception instanceof QueryFailedError &&
      exception.driverError.code === MysqlErrorCode.ALREADY_EXIST
    ) {
      return HttpStatus.CONFLICT;
    } else if (exception instanceof HttpException) return exception.getStatus();
    else return HttpStatus.INTERNAL_SERVER_ERROR;
  }
}
결과
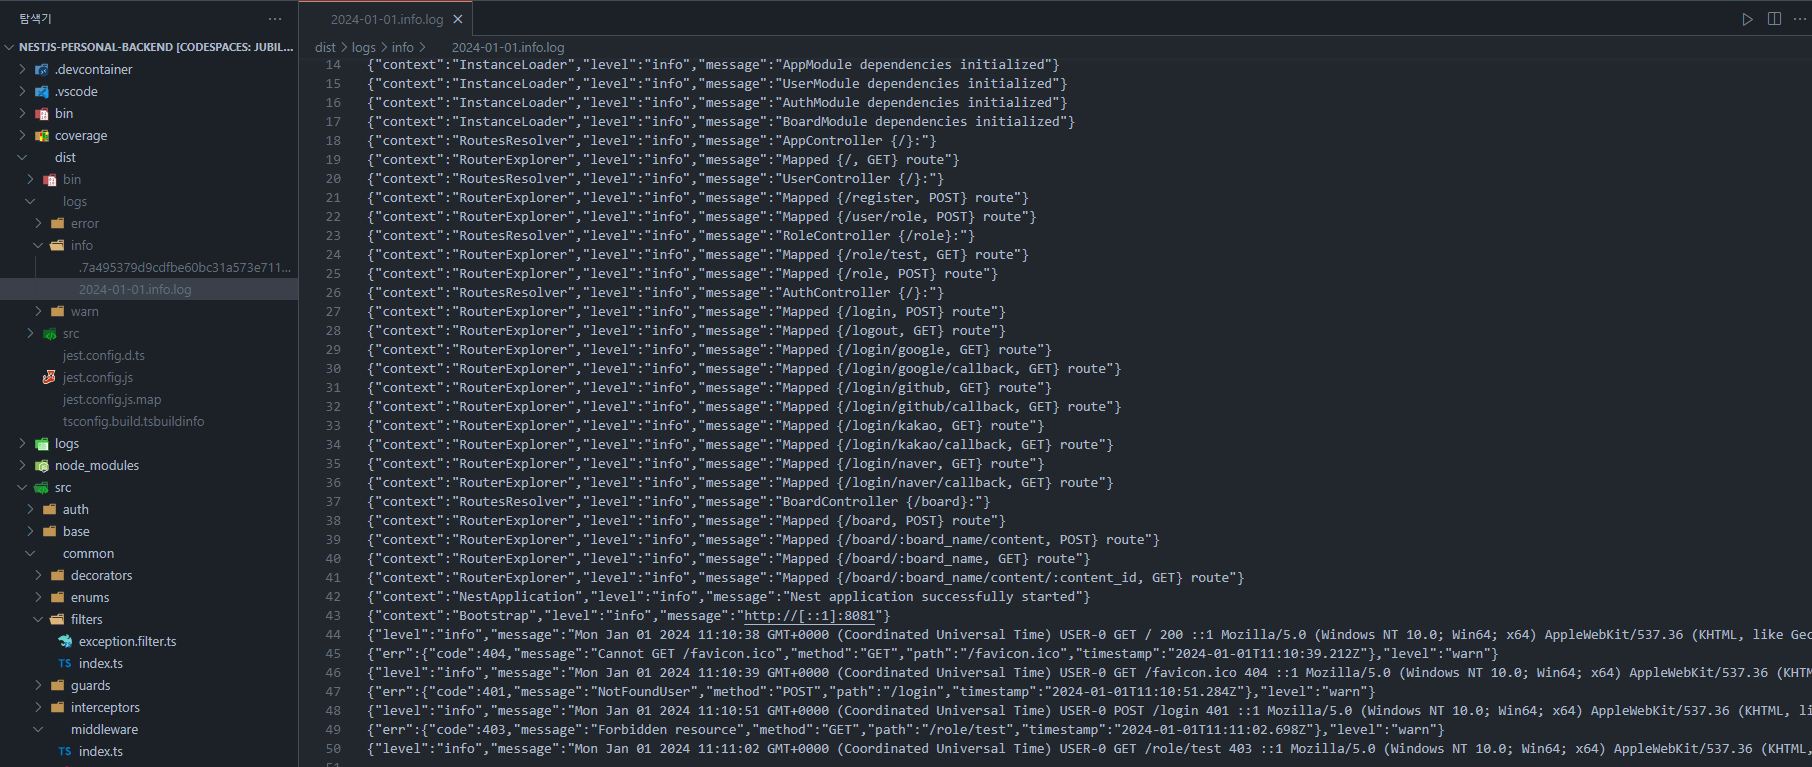
info, warn 등으로 나뉘어 지정한 format대로 로깅이 되고 있다.

모든 로그는 local에 YYYY-MM-DD.log 파일로 저장되어 아카이빙된다.

전체코드
americano212/nestjs-rest-api-templete-v1: [23.10.13 ~ ] NestJS REST API templete (github.com)
GitHub - americano212/nestjs-rest-api-templete-v1: [23.10.13 ~ ] NestJS REST API templete
[23.10.13 ~ ] NestJS REST API templete. Contribute to americano212/nestjs-rest-api-templete-v1 development by creating an account on GitHub.
github.com
